How to convert scanned documents into CSV
Learn how to convert scanned documents into CSV: define columns once, upload a photo or scan, and each document fills a row. Review the flagged values, then export UTF-8 CSV — Excel- and CJK-safe.
You have a stack of paper — invoices, receipts, delivery notes — and you need them as rows in a spreadsheet. Retyping is slow and error-prone, and a generic OCR tool dumps a wall of raw text that still needs untangling into columns. The job you actually want is narrower and more useful: turn a photo or scan of a document into a clean CSV row whose columns are fixed in advance, with anything that did not check out raised for review before it reaches the file.
This guide walks through exactly that. You define your columns once, point space-ocr at an image, and each document fills in a row automatically. Values that could not be matched against the printed page come back marked for review, so you check those instead of proofreading every cell. When you are done, you export the whole sheet to CSV — UTF-8 with a byte-order mark so Excel and CJK text open cleanly. No retyping, and every value can be traced back to where it sat on the page.
The shape of the workflow
Converting scanned documents into CSV breaks into four moves:
- Photograph or scan your documents — raster images (JPEG, PNG, TIFF, and similar). A phone photo is fine; auto-rotation handles sideways shots.
- Define your columns once — name the fields you care about (
vendor,date,total, line items…). This becomes the schema every document is read against. - Upload — each image is read and its values drop into a new row under your columns. No per-document configuration.
- Review the flagged cells, then export CSV — work only the values marked for review, then download the whole sheet as
<sheetName>.csv.
The payoff is consistency: because the columns are fixed up front, the tenth receipt lands in the same shape as the first, and the cells worth a second look are named for you rather than left to be found.
Every value knows where it came from
Before the steps, here is why this is trustworthy. Hover any field below — the outline on the document marks the exact spot that value was read from, and a value that did not line up with the printed page comes back marked for review instead of passing quietly. A CSV is only useful if you can defend the numbers in it, and here every cell carries the place it came from.
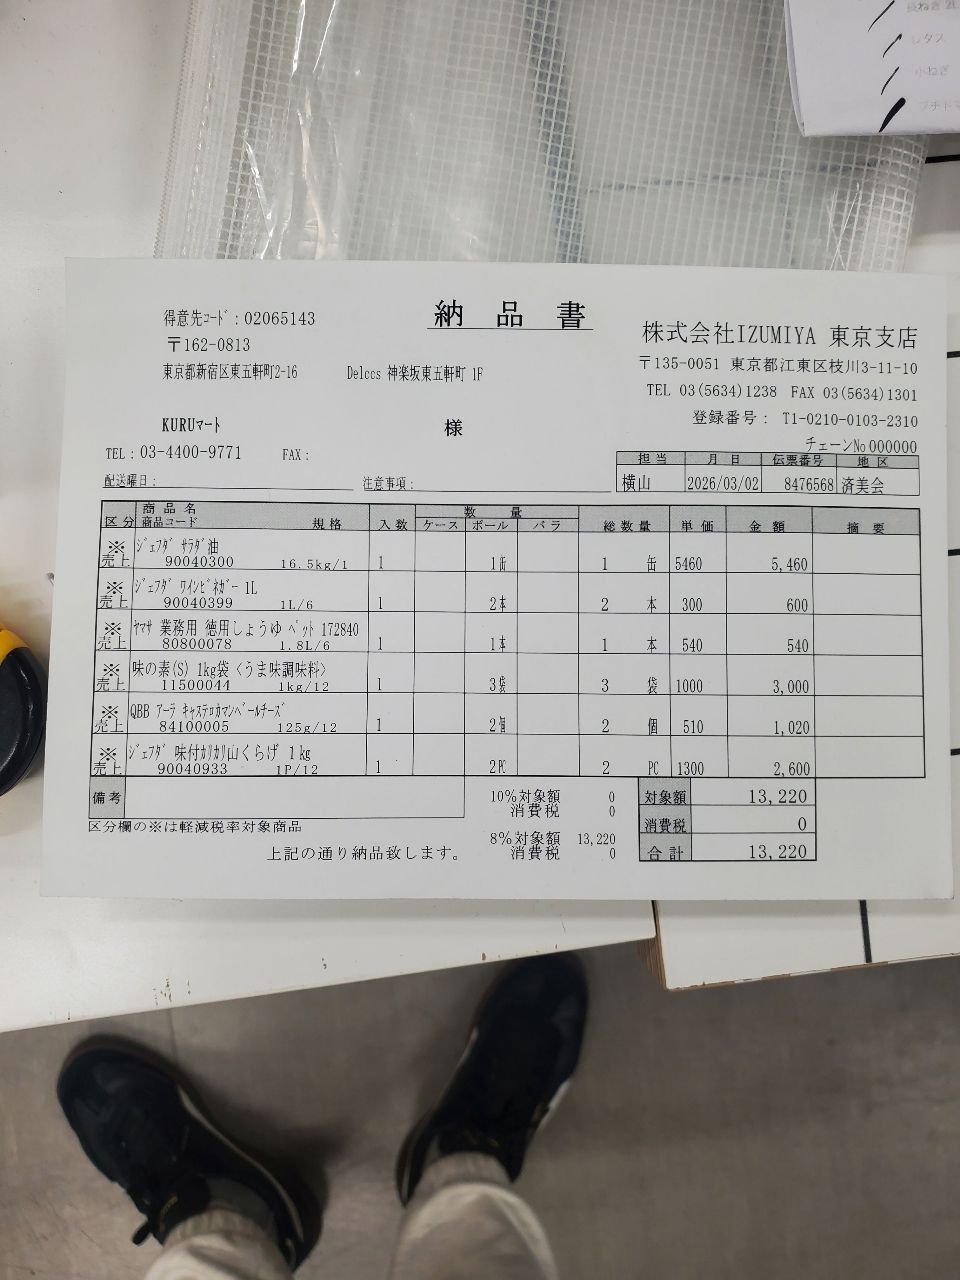
Each value with a box carries a verified on-page location — in data.cells[path], that is box + 4-point quad + evidence.match_ratio — on a 0–1000 normalized grid (0,0 top-left → 1000,1000 bottom-right), the same shape the live API returns. Hover a field to trace it back to the pixels it came from.
How to convert scanned documents into CSV, step by step
1. Capture the documents as images
space-ocr reads raster images — JPEG, PNG, GIF, BMP, TIFF, and WebP. Photograph receipts on a desk, scan invoices to PNG, or export pages from your scanner app. A scanned PDF works straight from the app, too — drop it in and each page is rasterized for you. Phone photos taken at an angle are fine: the engine reads EXIF orientation and corrects rotation, so a sideways shot still reads upright and the values still anchor to the right place.
2. Define your columns once
This is the step that turns OCR into a tidy table. Create a sheet with a column schema — the fields you want as CSV headers. Scalar columns are simple values (vendor, invoice_date, total); array columns capture repeating line items. You define this once, and every document you upload afterward is read against the same columns.
vendor        (string)
invoice_date  (string)
total         (string)
items         (array) → name, unit_price, qty
If you would rather not hand-build the schema, the sheet builder can detect the columns from one sample photo and let you edit the list it proposes. Working straight from the API, autoFields on POST /ocr/fields is the same shortcut: read one document with it, then reuse the field names it returns as your columns. For invoices specifically, see extracting line items from invoices.
3. Upload — rows fill themselves
With columns in place, upload your images to the sheet. Each document becomes a row: the engine reads the page and slots each value under the matching column. Drop in twenty receipts and you get twenty rows, all the same shape. Line-item arrays are kept as structured children of the row, ready to expand on export.
Values keep their printed notation rather than a tidied-up version — 7,855 keeps its comma, full-width characters and honorifics stay as they are, and nothing is quietly rewritten into a normalized form. What lands in a cell is the model's reading of the page, not a byte-for-byte copy of it, so the cells worth checking against the source are marked for you in the next step.
4. Review the flagged cells, then export to CSV
Not every cell needs a second pair of eyes. Each value is cross-checked against what the page actually prints, and the ones that did not line up — plus anything a column rule caught, such as a required column left empty — are marked for review. Open those, compare the value with the highlighted spot on the photo, and fix what is wrong; cells with nothing flagged go into the file as they are. Over the API the same work list is data.review.flagged, one entry per path with its reasons.
Then click export and the sheet downloads as <sheetName>.csv. The header row is built directly from your schema:
- A leading
#column (the row index). - Each scalar column name as written.
- Each array child flattened as
colName.childName— so anitemsarray withnameandunit_priceproducesitems.nameanditems.unit_pricecolumns.
Rows that contain a line-item array expand into sub-rows — the parent's scalar values appear once and each line item gets its own row beneath it, so an invoice with eight lines becomes eight CSV rows under one vendor and date. The file is written as UTF-8 with a byte-order mark (BOM), which is what lets Excel — and Japanese, Korean, or Chinese text — open without mangled characters.
If you edited a cell by hand, your manual value overrides the original OCR value in the export, so corrections flow through to the CSV.
The download itself costs 1 credit on the Free and Pay-as-you-go plans and nothing on Starter and Pro. Re-downloading the same sheet is free — a sheet is charged again only once new rows have been added to it. See pricing for current rates.
The CSV is built from your columns, not guessed. Headers come from your schema (# + scalar names + array.child for line items), array rows expand into sub-rows, and the file ships as UTF-8 with a BOM so Excel and CJK text open cleanly. Manual edits override the OCR value in the export — the column shape is fixed the moment you define it, which is what makes every download predictable.
Doing it over the API
The same flow is available headlessly. Create a sheet with columns, upload images to it, then pull the structured rows with GET /view — server-side, with no OCR re-run and no charge. There is no CSV endpoint: you write the file yourself from the JSON that comes back, or download it from the web app. GET /view also lets you filter (where), sort, and select columns first, so you can ship only the rows you need.
Each row carries the same shape as a direct call: values for the business data, cells[path] for the coordinates (box and quad) and the verification verdict (verified, review), and review.flagged as the list of paths to look at. Declare a column as number, integer, or date and values still holds the printed notation — the parsed reading is added beside it on each cell as normalized (a direct POST /ocr/fields call returns the whole tree as data.normalized). Write the printed form into the column a person reads and the normalized one into the column a system computes with.
# 1. Create a sheet with the columns you want as CSV headers
curl -X POST https://api.space-ocr.com/create \
  -H "Authorization: Bearer $SPACE_OCR_API_KEY" \
  -H "Content-Type: application/json" \
  -d '{
    "path": "/invoices",
    "type": "sheet",
    "name": "june-invoices",
    "columns": [
      { "name": "vendor", "type": "string" },
      { "name": "invoice_date", "type": "string" },
      { "name": "total", "type": "string" },
      { "name": "items", "type": "array",
        "children": [
          { "name": "name", "type": "string" },
          { "name": "unit_price", "type": "string" }
        ] }
    ]
  }'

# 2. Upload document images — each one fills a row
curl -X POST https://api.space-ocr.com/upload \
  -H "Authorization: Bearer $SPACE_OCR_API_KEY" \
  -F "path=/invoices/june-invoices" \
  -F "files=@invoice-01.png" \
  -F "files=@invoice-02.jpg"
Once the rows are in, GET /view returns them as structured JSON you can write straight to a CSV — or hand off to your accounting system. For a full walkthrough of the extraction endpoint and field specs, see the invoice data extraction API guide and the API docs.
Scanned PDFs and a note on inputs
space-ocr's engine works on raster images, not PDF bytes — but in the app you don't deal with that yourself: drop a scanned PDF and each page is rasterized to an image automatically before OCR. Only when you call the public API directly do you render each page to an image (PNG or JPEG) first and upload those. If your goal is specifically Excel rather than CSV, the same flow applies — walk through it in convert scanned PDF to Excel. CSV is the lowest-friction target: it opens everywhere, and the BOM-prefixed UTF-8 export means no encoding surprises.
A real-world build: batch CSV with nothing stored outside the PC
A developer in our demo program built this exact workflow as a small Windows desktop app: pick a folder of document photos and scanned PDFs, batch-read every page through POST /ocr/fields, check the flagged values against the original image — the returned quad outlines the exact spot each value was read from — then export a CSV. No server of its own, no database, no cloud storage.
The part worth copying is where the data lives. The POST /ocr/* endpoints are stateless: an image is processed and the response returned, and neither the image nor the result is stored on the API side. So everything persistent stays on the user's machine — the source photos in their folder, the reviewed values in the app, the CSV wherever it is saved, and the API key in the user's own profile directory rather than embedded in the executable. The only thing that ever leaves the PC is the API call itself, and it leaves nothing behind.
For accounting and back-office teams that would rather not hand documents to yet another cloud service, this settles the retention question before it is asked: there is nothing to delete afterwards, because nothing was kept anywhere. The app also splits the two value forms sensibly — the screen shows values as printed, because a human compares them against the original, while the CSV receives the normalized values, because a downstream system computes with them.
- Capture the documents as imagesPhotograph or scan each document to a raster image (JPEG, PNG, TIFF, etc.). Phone photos are fine — EXIF auto-rotation corrects sideways shots. Scanned PDFs work too: drop the PDF into the space-ocr app and each page is rasterized automatically (only an API-direct call needs you to render each page to an image first).
- Define your columns onceCreate a sheet with a column schema: scalar columns like vendor, date, and total, plus array columns for repeating line items. This becomes the CSV header and is reused for every document.
- Upload the imagesUpload your document images to the sheet. Each image is read and its values fill a new row under your columns automatically — no per-document setup, and values keep their printed notation instead of being rewritten.
- Review the flagged cells, then export to CSVOpen only the cells marked for review, compare each against the highlighted spot on the source image, and correct what is wrong — over the API the same work list is data.review.flagged. Then export the sheet. It downloads as <sheetName>.csv with a header of # plus scalar column names plus array children as colName.childName. Line-item rows expand into sub-rows, and the file is UTF-8 with a BOM so Excel and CJK text open cleanly.
How do I convert scanned documents into CSV?
Will the CSV open correctly in Excel, including Japanese or Chinese text?
How are line items handled in the CSV?
Can I convert a scanned PDF to CSV?
Do I have to define columns for every document?
Turn your scanned documents into CSV
Define your columns once, upload, export. Free tier — 100 credits a month, no credit card. Every value comes back with its on-page location.